I turned just slightly to my left and looked through the aperture again. Perfect. I then moved the barrel of the lens to all three perch points and at each one softly squeezed off the shutter. I checked to see that all the photographed points were sharp and knew I was ready. In about a half an hour I could have a good photo session with a pair of dippers.
The evening before I had glassed this pair of birds dipping and diving after insects in this fast-flowing mountain stream. I could see they were using three closely associated perch points and just to the left of the stream was a flat bit of beach where I could set up stool, tripod, camera and lens.
I was now ready. The folding stool was comfortable, the lens was level with the perch points and I had a soft piece of camo wrapped around the front of my tripod legs. I had good body alignment, perfect site pictures and knew how to initiate soft shutter squeeze.
There was one part missing, sunlight. With sunlight I can run my camera one way, without sunlight I have to change my procedure. I was using the aperture-priority setting so my shutter speed was one-one hundred and sixtieth of a second. I had the camera’s white balance set at cloudy and the meter set on spot. My lens was zoomed to four-hundred mm with an f/4 wide open aperture and the focus limit switch set to full.
The range from lens to perch point was about fifteen feet. At that distance the “depth of field (DOF)” of my lens, at four hundred mm, is one-point-one-three inches. It is important to have your image sharp. If part of the bird is out of DOF, that part will be soft but I don’t want to waste DOF. If the dipper is three inches wide I can reduce my zoom to three-hundred-seventy-five, increasing the DOF some, which also reduces my shutter speed a bit. Thus, if the bird is broad-side I can put the focus point where the neck meets the shoulder a making every part of the dipper with-in the DOF.
Lastly I keep my release mode dial at “continuous high speed”. But with low light I’ll likely waste concentration with shutter bursts. So it is important for me to control my shutter squeeze as carefully as I can. By taking up the shutter slack I get lens focus exactly where the focus point is and with concentration moving the shutter more, just enough, so that when the bird is stopped I can follow through getting one image with-out engaging continuous shutter bursts. Single shutter burst on continuous allows me options with-out wasting time with the release mode dial.

Figure 1 - Untouched Dipper
Figure one is an untouched image of a dipper. Figure number two is a much cropped version of the same image. By holding the camera tightly against my forehead and concentrating on a careful shutter squeeze the cropped image shows a fairly sharp photo. All birds stop for a moment, even at lower light. Be ready.
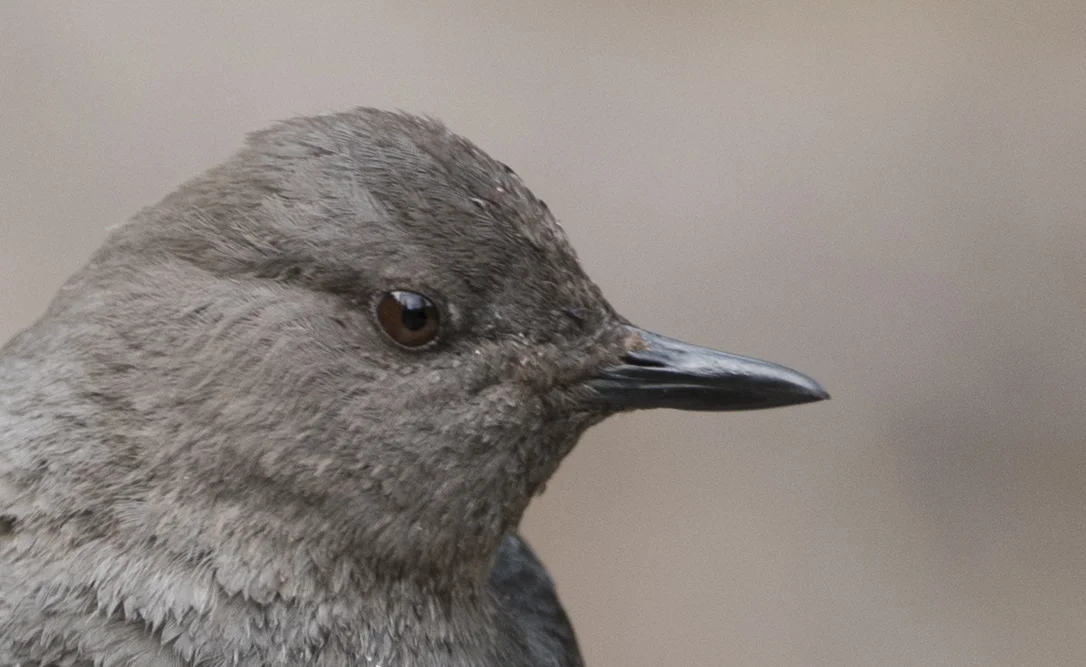
Figure 2 - Cropped Dipper
Dippers are crazy, unique, and small and “tough as nails” birds to photograph. They live, mostly, on harsh, fast moving mountain streams. After a couple photographs you see some differences from other birds. They have small white feathers on their eyelids and their feathers have a coarser appearance. Water has viscosity, coarser appearing feathers could have something to do with how they manage their movement in and under water. Still, they are very hardy photo subjects.
My method for photographing small birds changes with good sunlight. No other light source treats color better than sunlight. Ideally I want the sunlight just barely over my right shoulder or my left shoulder.
This slight difference of angle of light can allow faster shutter speeds to show interesting subtle color variations of image surface.
A few days before my dipper photography session I had the opportunity to spend camera time with a small flock of cedar waxwings. Unlike dippers, waxwings have a fairly wide window of feeding opportunity. Waxwings can fly-catch, collect insects on the edges of river ice, snip ripe and dried berries as well as small nectar baring blossoms.
My Canton Easter hedge was just starting to show small white/pink blossoms when late in the afternoon I heard waxwing calls. The sun was perfect and I had time. I quickly set up my camera with a 300mm f/2.8 lens and set it up on the tripod. The birds were just above me in the hedge so because I had a very smooth tripod head I raised the camera more by the tripods center column after moving about fifteen feet from the feeding area. In this way I could look through the camera, up, comfortably and not have to scrunch any. I had perfect body alignment. Next, as they were busy feeding and ignoring me, I added a ten pound weight to the tripod, increasing the stability. I already had the camera adjusted to “continuous high speed” and the LCD was indicating my shutter speed would be one-sixteen-hundredth of a second. With that shutter speed I could stop any waxwing during a feeding frenzy.

Figure 3 - Waxwing
Now was a time to take a moment and watch. An individual waxwing would perch (image #3) among a small cluster of blossoms, sit up straight for a moment, as though he was studying his surroundings then cock his head forward. The “tell” was the waxwing bending its head forward. This waxwing had picked the best looking blossom. As soon as I saw him tilt his head I would start the shutter burst. During the course of a shutter-burst the waxwing would reach down, grab the blossom stem and with a twist and pull of his head and body snap the blossom off and as he straightened he would swallow the nectar laden flower. I repeated this shutter-burst process several times in the next twenty-five minutes. The result was a highly cropped, sharp image (image #4) of a waxwing just about to grasp a flower stem with its beak.

The real fun in small bird photography is learning about the birds. They all have similarities and they all have differences. But to capture these guys you have to have a comfortable position, an understanding of the depth of the field-of-view at the distance you are shooting and a good shutter-squeeze.